Game localization has traditionally been a time-consuming and expensive process. Manual translation work often requires weeks of coordination with external services. AI language models now provide developers with powerful tools to streamline this workflow while they maintain quality and reduce costs.
This guide demonstrates how to set up automated AI-powered translation for your Unreal Engine project using the AI Localization Automator plugin . The plugin turns hours of manual work into minutes of automated processing.
Why AI-Powered Localization?
Modern AI translation offers several advantages over traditional methods:
- Speed: Translate hundreds of text entries in minutes rather than days
- Cost-Effectiveness: Significantly reduce translation costs, especially for indie developers
- Consistency: Maintain consistent terminology and style across your entire project
- Iteration-Friendly: Quick turnaround allows for rapid prototyping and testing
- Multiple Providers: Choose from various AI services based on quality, cost, and privacy needs
Prerequisites
Before you start automated translation, ensure you have:
- Localizable text content in your project (using
FTextin C++ or Text properties in Blueprints) - A configured localization target with gathered source text
- At least one target language added to your localization target
- Access to an AI translation service
- The AI Localization Automator plugin installed
If you’re unfamiliar with making text localizable in UE, the fundamental steps are: For detailed setup instructions, see the Localization Setup Guide
.New to Unreal Engine localization? Click here for setup basics
FText (Text in Blueprints) can be localized
Setting Up AI Translation
Step 1: Access the AI Translation Manager
The AI Localization Automator plugin integrates directly with Unreal Engine’s Localization Dashboard. You’ll find AI translation options in your localization target’s toolbar.
- Open Tools → Localization Dashboard
- Select your localization target
- Click the “AI Translate” button in the toolbar
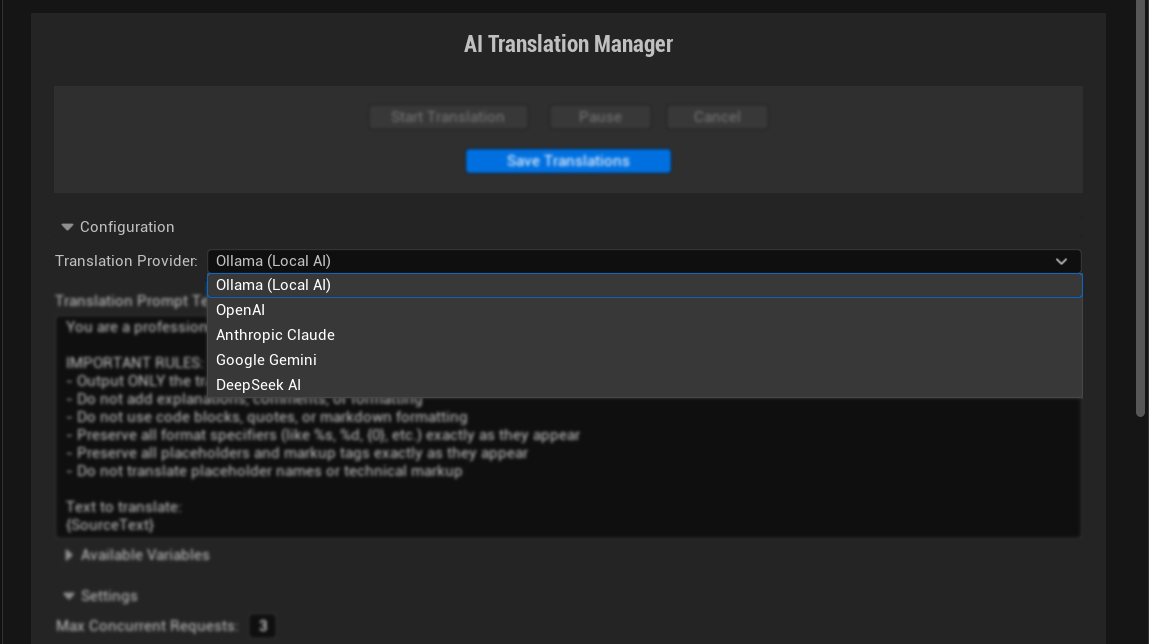
Step 2: Choose Your AI Provider
The plugin supports multiple AI providers, each with different advantages for your project needs:
Local AI (Ollama)
- Complete privacy - data never leaves your machine
- No API costs or usage limits
- Works offline once models are downloaded
- Requires local setup and capable hardware
Cloud Providers
- OpenAI: Consistently high quality, extensive model selection
- Anthropic Claude: Excellent for creative and narrative content
- DeepSeek: Cost-effective option with good quality
- Google Gemini: Strong multilingual support with competitive pricing
Step 3: Configure Your Translation Service
Configuration varies by provider but typically includes:
For Cloud Services:
- API Key for authentication
- Model selection (newer models generally offer better quality)
- Temperature settings (0.3 recommended for consistent translations)
- Request timeout and retry settings
For Local AI:
- Base URL (typically
http://localhost:11434for Ollama) - Model name (e.g., “llama3.2”)
- Local processing parameters
For detailed configuration options for each provider, see the Translation Providers Guide .
Step 4: Process Your Translations
With configuration complete, the automated translation process becomes straightforward:
- Review discovered content - The system automatically finds all localizable text
- Start processing - Click “Start Translation” to initiate batch translation
- Monitor progress - Watch real-time updates as translations complete
- Save results - Click “Save Translations” to commit successful translations
The entire process typically completes in minutes for projects with hundreds of text entries.
Completing the Localization Pipeline
After AI translation, you need to complete the standard UE localization workflow:
1. Update Localization System
Return to the Localization Dashboard and run “Gather Text” to update the system with your new translations.
2. Compile Translations
Use “Compile Text” to create the binary files your game will actually use.
3. Package Language Support
In Project Settings → Packaging, ensure your target languages are selected for packaging:
Testing Your Translations
Verify your automated translations using UE’s built-in preview features:
Editor Preview: Set “Preview Game Language” in Editor Preferences → Region & Language
UMG Preview: Use the language selector in UMG widget previews
Best Practices
Start Small
Begin with a subset of your content to test provider configuration and quality expectations before you process large batches.
Monitor Quality
Review translations, especially for:
- Technical terminology specific to your game
- Cultural references that may need adaptation
- UI text that must fit within space constraints
Maintain Consistency
Use consistent prompt templates and provider settings across your project to ensure terminology remains uniform.
Version Control Integration
The AI Localization Automator integrates with UE’s standard localization files, which makes it compatible with your existing version control workflow.
The Impact on Game Development
Automated AI translation changes localization from a bottleneck into an enabler:
- Faster Iteration: Test your game in multiple languages during development
- Broader Market Access: Cost-effectively target international markets
- Enhanced Accessibility: Make your game available to global audiences
- Resource Allocation: Focus human expertise on polish and cultural adaptation rather than initial translation
Key Features of AI Localization Automator
The AI Localization Automator plugin provides:
- Multiple AI Providers: Choose from OpenAI, Claude, DeepSeek, Gemini, or run locally with Ollama
- Seamless Integration: Built-in integration with Unreal Engine’s Localization Dashboard
- Batch Processing: Translate hundreds of text entries efficiently with configurable concurrency
- Smart Retry System: Automatic retry logic with configurable failure thresholds
- Real-time Progress Tracking: Live progress updates with detailed status information
- Production Ready: Tested extensively with large-scale localization projects
For complete documentation, visit docs.georgy.dev/ai-localization-automator .
Conclusion
AI-powered localization represents a significant shift in how developers approach international game distribution. The AI Localization Automator automates the translation process while it maintains integration with Unreal Engine’s robust localization system. Developers can focus on creating great games rather than managing complex translation workflows.
Whether you’re an indie developer who wants to expand market reach or a studio that manages large-scale localization projects, automated AI translation provides the tools to make multilingual game development both accessible and efficient.